

Overview
This guide is for Admins and IT administrators who move their organisation to Legora’s global authentication. You run the migration yourself from the Authentication migration page in Settings. Global authentication gives your organisation its own sign-in address and one sign-in setup across Legora. The migration has six steps. Steps 2 to 5 depend on how your organisation uses Legora, so check the table to see which ones apply to you. Make every change in addition to your existing configuration. Do not remove existing URLs or settings until the migration is complete.You need the Let members configure SSO and IP restrictions permission, which the Admin role includes by default. The Authentication migration page appears only when self-serve migration is turned on for your organisation. If you have more than one Legora organisation, migrate each one separately. You don’t have to migrate them at the same time.
The Authentication migration page in Settings guides you through the whole migration, one step at a time and in the same order as this guide. It shows which tests have passed and what’s still missing before you can complete the migration.
To open the page, from your name on the menu, select Settings > People > Authentication migration.
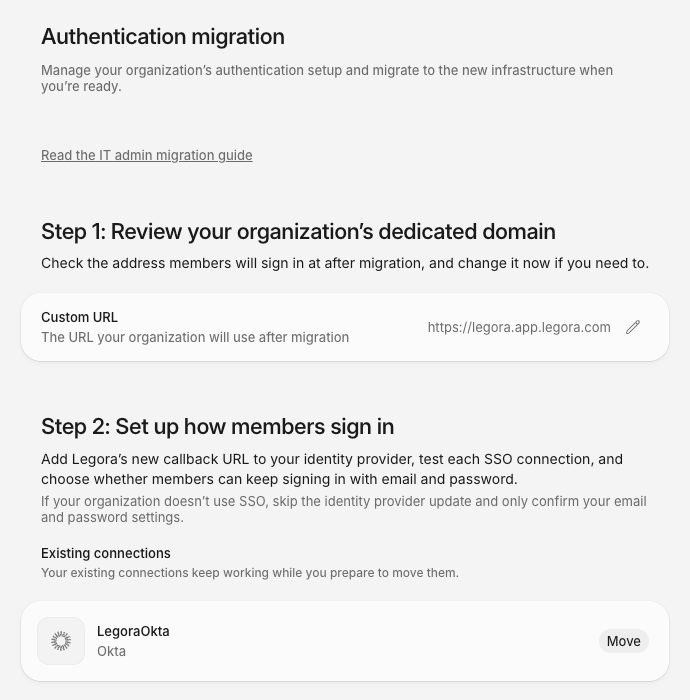
Step 1: Review your organisation’s dedicated domain
This step sets the address your users sign in at after the migration. The Authentication migration page shows it as Custom URL, for examplehttps://acme.app.legora.com.
When you need this step: Always.
- On the Authentication migration page, review Custom URL. Legora fills it in for your organisation.
- To change it, select the edit icon next to Custom URL, enter a new Subdomain, and select Save.
Step 2: Set up how members sign in
This step sets up sign-in for global authentication. You register Legora’s global sign-in service with your identity provider, such as Okta or Microsoft Entra ID, and choose whether members keep email and password. Your existing connections keep working while you prepare the new ones.When you need this step: Your organisation uses SSO. If it doesn’t, skip the identity provider changes and only confirm email and password sign-in. You can’t complete the migration without that confirmation.
- SAML:
https://sso.legora.com/api/oauth/saml - OpenID Connect (OIDC):
https://sso.legora.com/api/oauth/oidc
- Okta: Okta supports SAML and OIDC. Add the URL for the protocol you use for Legora to Sign-in redirect URIs in the Legora application settings.
- Microsoft Entra ID: Use OIDC. Add the OIDC callback URL to the redirect URIs of the Legora app registration. See Integration Overview - Entra ID Single Sign-on.
- Other identity providers: Add the callback URL for your provider’s protocol, following your provider’s documentation.
SAML connections
A SAML app registration is tied to Legora’s Entity ID, so you can’t point your existing SAML app at global authentication. Create a new one instead:- In your identity provider, create a new SAML app registration.
- Copy Legora entity ID and Legora ACS URL from New SAML app settings on the Authentication migration page into the new app registration:
- Entity ID, Audience URI, or Identifier:
https://sso.legora.com - ACS URL, Single Sign-On URL, or Reply URL:
https://sso.legora.com/api/oauth/saml
- Entity ID, Audience URI, or Identifier:
- Add the attributes from SAML attribute statements.
- Leave your existing SAML app as it is. It keeps serving sign-ins until you complete the migration.
SAML attribute statements
Legora reads each member’s email address and name from the SAML assertion. It matches attributes by their exact name, and it can’t sign a member in without an email address. In Okta, set these values on the new SAML app:
Name the email attribute
email. Legora doesn’t read other names, such as mail.
In other identity providers, send the member’s work email in an attribute named email. Send the first and last name as given_name and family_name.
OpenID Connect scopes and claims
If your identity provider asks which OIDC scopes Legora needs, enable these:openid: Required for OIDC sign-in.profile: Provides the user’s name.email: Provides the user’s work email address.
Connect and test
- Under Existing connections, select Move next to each OIDC connection to carry it over.
- Under New connections, select Add to add each new SAML connection.
- Select Run test on each connection and sign in with your identity provider.
Email and password sign-in
This setting decides whether members can sign in with email and password after the migration. The Email and password card appears when members sign in with a password today. Changes apply to the new sign-in page right away, and members keep using your current sign-in page until you complete the migration.- Your organisation uses SSO: Under Keep email-and-password sign-in after migration?, choose Yes, keep email and password or No, use SSO only, then select Save.
- Your organisation doesn’t use SSO: Select Confirm to keep email and password.
Step 3: Update integration callback URLs
This step lets your integrations send users back to Legora after they connect. You add a new redirect URL in each integration’s admin settings.When you need this step: Your organisation uses iManage on-premises, SharePoint, Google Drive, or Microsoft 365 with your own Entra app. Step 3 on the Authentication migration page lists iManage on-premises, SharePoint, and Google Drive when you need to update them. Microsoft 365 isn’t listed there, so check its Entra app setting yourself.
Use these exact URLs, even though your users sign in at your custom URL.
Check it: In step 3 on the Authentication migration page, select Run test for each integration and complete the sign-in in the pop-up. Each one shows Passed. If your browser blocks the pop-up, allow pop-ups for Legora and try again.
Step 4: Install the Global Word and Outlook add-ins
This step prepares the Global Word and Outlook add-ins, which replace the regional add-ins. The regional add-ins stop working as soon as you complete the migration, and the Global add-ins work only after it.When you need this step: Your organisation uses the Legora Word or Outlook add-in. Deploy the Global add-ins before you enable global authentication in step 6.
- Centrally managed by IT: Deploy the Global add-ins from Microsoft AppSource. See Outlook add-in for admins and How do I enable the Word Add-in for users in my Legora org?.
- Installed by users: Ask users to install the Global Word Add-in and the Global Outlook Add-in from Microsoft AppSource.
- On-premises: Deploy the Global Word manifest and the Global Outlook manifest.
Step 5: Update firewall rules
This step lets your network reach the global sign-in services. Apply the rules to outbound traffic, and to inbound traffic where your network, proxy, or firewall setup needs it.When you need this step: Your network, proxy, or firewall restricts traffic to Legora.
- Your custom URL from step 1, for example
https://acme.app.legora.com https://app.legora.comhttps://login.legora.comhttps://identity.legora.comhttps://token.legora.comhttps://sso.legora.com, if you use SSOhttps://auth.legora.comhttps://word-addin.legora.com, for the Global Word Add-inhttps://outlook-addin.legora.com, for the Global Outlook Add-in
auth.eu.legora.com, allowed. For the full list, see Legora network and domain requirements.
Check it: From a device on your corporate network, open your custom URL and sign in. Then ask a small group of users to do the same and confirm their usual work, including integrations, still works.
You can also open connectivity.legora.com from your corporate network. It checks the global sign-in domains and creates a report that you can send to support@legora.com.
Step 6: Enable global authentication
This step switches your whole organisation to global authentication. You can’t undo it, so plan it outside working hours and tell your users beforehand.When you need this step: Always, after you finish the steps that apply to you.
- Select your custom URL to open the new sign-in page in a new tab. Sign in to check that your setup from step 2 works. Members keep using your current sign-in page until you complete the migration.
- If your organisation requires two-factor authentication, choose Transfer MFA settings to keep the requirement, or Skip transfer.
- Select Complete migration.
- Review the custom URL in the confirmation, then select Complete migration.
- Your custom URL is set.
- Every active SSO connection shows Passed.
- At least one sign-in method is active, and your email and password setting is saved.
- You’ve made an MFA choice, if your organisation requires two-factor authentication.
What happens when you complete the migration
The change applies to everyone in your organisation at once:- Users stay signed in. No one is signed out when you complete the migration.
- SSO users keep signing in through SSO and won’t notice a difference.
- Email and password users set a password the next time they sign in. Legora emails them a code from Reset your Legora password, and the new password must be at least 15 characters. For the user steps, see Why can I not log in to Legora?.
- Two-factor authentication: If you transferred MFA settings, members set up two-factor authentication again after the migration.
- Regional URLs: Users who open a regional Legora URL while signed in are forwarded to your custom URL.
- Add-ins: The regional Word and Outlook add-ins stop working and ask users to switch. If you haven’t deployed the Global add-ins from step 4 yet, roll them out now.
- Settings: The Authentication migration page is removed. You manage sign-in from Settings > People > Authentication. See How do I manage authentication for my organisation?.
- Profile: On every member’s Settings > Personal > Profile page, Sign-in under Workspace access shows Global. Use it to confirm the migration applied.
FAQ
These answers cover common questions from Admins and users during and after the migration.How do users sign in on the mobile app?
After the migration, users sign in to the Legora mobile app again. On the sign-in screen, they select Global as the data region, then sign in with their usual method. See Legora mobile app FAQ.What happens to Assistant and Agent chats?
Agent chats and Outlook Assistant chats are stored in Legora, so they stay available in the Global add-ins. Users don’t need to do anything. Word Assistant chats, including Playbook results, are stored in the regional Word Add-in and aren’t moved. Users can export them from the regional Word Add-in and import them into the Global Word Add-in. The regional add-in still offers Export now after the migration. See How to move your Word Add-in Assistant history to the Global Add-in.Can we still invite other Legora customers to our Portal?
Yes, once both organisations are on global authentication. Until then, Portal invitations to another Legora customer don’t work. Invitations to clients who don’t use Legora aren’t affected.Can I undo the migration?
No. After you select Complete migration, your organisation stays on global authentication and you can’t change the custom URL.Do I need to migrate all my Legora organisations at the same time?
No. Migrate each organisation from its own Authentication migration page, whenever it’s ready.Why does https://sso.legora.com show “404 Not Found”?
sso.legora.com is a sign-in service, not a website, so its root address shows 404 Not Found by design. SSO still works. Use the full callback URLs from step 2 and test with Run test.
Why does a SAML connection fail its test?
Check that the assertion sends the member’s email address in an attribute named exactlyemail. Other names, such as mail, aren’t read. For the Okta values, see SAML attribute statements.